5 ways to stop your kids being bored

No Carving Halloween Pumpkins

For a brief few days pumpkins during October, jack-o’-lanterns will flicker across many countries, the happy result of wicked imaginations, fun-filled family afternoons, and lots of elbow grease. If your family is raring to carve a pumpkin this year, we’ve got the scoop on how to do it right.
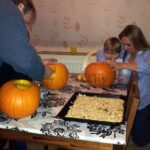
After a fun afternoon searching through the pumpkins on display at our local pumpkin patch, we chose our favourites and headed home for a carving session. Last year, We were a bit fancier and carved our pumpkins with bats and cats and other designs. This year the children were given a lot more freedom with their pumpkin designs. They all decided to carve faces into their pumpkins.
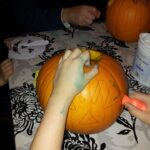
First, they drew their designs onto the pumpkins. Lots of wet wipes were used to clean off the designs they rejected along the way. Finally, once they had settled on their design, I removed the tops so they could hollow out the inside ready for carving. I’ve written some handy hints below on how to do this step.
My boys both detest the feel of the pumpkin flesh and so used spoons and other items to carve out their pumpkins but my girl loves the squishy feel of the flesh and seeds and really got into hollowing hers out. We set aside the seeds so that we could roast them later in the week. All three kids thoroughly enjoyed putting their hands into the seed bowl and exploring the slippery texture of the seeds sliding between their fingers.
We carved the faces using proper carving kits bought at the pumpkin picking farm shop. This makes the job a lot easier. I held my 4 year old’s hand while he cut, to guide and add some strength. My husband helped the middle boy and for the first time, my girl (8) was allowed to go solo! She was very pleased to be trusted to use the tools on her own and did a great job. I helped her with the finer detailed areas she had trouble with.
Lastly, we wiped down the outside of the pumpkins to make sure they were clean and squirted an antibacterial spray inside to deter bugs and flies and thereby hopefully slowing down the rotting process.
We had a super time doing this together and the roasted pumpkin seeds are tasty too 🙂
- drawing their designs on first
- A scary face
- Loving that squishy feeling of hollowing out the pumpkin
- This one does not like to touch the pumpkin flesh
- This one also won’t touch the flesh
- Helping my youngest carve
- He’s proud of his pumpkin
- My big girl carving on her own
- First time solo carving
Below I’ve included some practical information and tips on how to choose, carve, and care for your pumpkin successfully.
Table of Contents
Choose a Halloween Pumpkin
Whether you’re picking your own or perusing a farm stand or grocery store, look for pumpkins that are large, ripe, and have smooth, even surfaces and at least a 2-inch stem (stemless, dented and bruised pumpkins may already be in decline). If you plan to light your jack-o’-lantern with a candle, the pumpkin should be at least 9 inches high (unless you use a small tea light candle).
Make a Halloween Pattern
To design your own jack-o’-lantern, take a cue from your pumpkin–is it tall, squat, or blessed with a curly stem or irregularity you can incorporate into the design? What’s the mood going to be– scary, goofy, artistic, just plain weird? Once you have a plan, sketch your pattern with a pencil and paper. If drawing freehand doesn’t appeal, or if you’re aiming for a complex pattern, use a stencil or template.
Cut out the top (or bottom)To make a lid, draw a circle or a hexagon at least 5 inches in diameter around the pumpkin’s stem. Cut out the lid at an angle (so that the outside edge is larger than the inside) to keep it from slipping inside. For a carving tool, we recommend a pumpkin saw. Those using knives should carve gently and steadily. (Tip: Don’t slide the knife all the way out of the pumpkin.) When the lid is free, scrape it clean of seeds and pulp. Instead of removing the top, you may choose to remove a section from the bottom or side of the pumpkin. (This works well for an unstable or small pumpkin)
Scrape out the Inside
This delightfully slimy job calls for a large metal spoon or an ice-cream scoop. Little kids can easily remove all the seeds and mushy stuff. Then a stronger pair of hands can take over scraping. The thinner the wall, the easier it is to carve and the brighter your lantern will be. Scrape until you’ve had enough or until the wall is 1 to 1 1/2 inches thick (stop before you compromise the strength of the walls). At the base, flatten a spot for the candle (again, don’t make it too thin, or the bottom will rot).
Transfer the Halloween pattern
There are two ways to transfer your design onto the pumpkin. One is to copy it freehand onto a clean, dry pumpkin with a water-based marker (mistakes can be easily corrected with a paper towel). The other is to tape your pattern or template to the pumpkin, then score the design into the skin by poking holes through the pattern with a nail or plastic poking tool (available in some pumpkin-carving kits).
Carve a Pumpkin
Okay, now you’re ready to sculpt. Start at the center of your design and work outward (this avoids putting pressure on areas already carved). Begin with the innermost and smallest features–eyes before eyebrows, for instance–and try to carve the inside lines of each feature before the outside lines. Be gentle: If you’re using a knife, run it over each line a few times, rather than pushing it all the way through.
Don’t cut all the way to the end of a line on the first cut. As each shape loosens up, gently push it out of the pumpkin with a finger or a dull pencil point (a good job for small kids). Larger shapes, such as gap-toothed grins, may have to be removed in pieces.
Tip: If you cut something you didn’t intend to, perform an ad hoc pumpkin surgery: Stick a toothpick through the flesh side of the piece and fit it back into place.
Experiment with Shading and Lighting
You can create dramatic effects by letting candlelight through the pumpkin in varying intensity. For a shaded effect, don’t cut all the way through the pumpkin. Instead, make a shallow, angled (or V-shaped) cut (1/8 to 1/2 inch, depending on the thickness of the pumpkin wall), then peel away the outer flesh with a knife tip, spoon, or vegetable peeler. You also can use deep, angled cuts to remove larger pieces, so that the light reflects off the walls of the hole.
Test Drive your Pumpkin
Now is the moment of truth. Place a candle inside your pumpkin (votives (tea lights) are more stable than tapers). Light the candle, put on the lid, and turn out the lights. If the candle doesn’t stay lit, increase the air supply either by enlarging some of the features or by carving a vent on the back of the lid. Lastly, put your jack-o’-lantern in a place of honor (away from flammable), and remember to blow out all candles before you go to sleep.
More Halloween
Pumpkin Carving Tips
Plan on carving no earlier than a day or two before Halloween–jack-o’-lanterns have short “step” lives. And remember to bring your porch pumpkin indoors on nights when the temperature is expected to drop below freezing.
- Draw your design on the pumpkin with a water-based marker beforehand. Mistakes are erased easily with a damp sponge.
- Cut the top and any large areas with a sharp, straight-edged knife. A dull blade is not a safer alternative.
- Serrated metal saws, now widely available in carving kits, are a safer alternative to knives and allow younger children to get in on the action.
- Carve away from yourself; kids should carve only under adult supervision.
- Never hold the knife in a stabbing position.
- When carving, keep a portion of the knife blade in the pumpkin and use slow, steady saw strokes.
- Cut the lid at an angle so the outside diameter is larger than the inside. This prevents the top from falling into the pumpkin when it shrinks.
- Scoop out seeds and stringy flesh with a large spoon or ice cream scooper.
- Carve the facial features closest to the center first and work outward. Cut out the larger features in sections.
- Use a craft knife for details and the tip of a potato peeler to make small circles and curves.
- Remove carved portions by gently pushing them into or out of the pumpkin.
- Reattach any section that is accidentally removed by using a toothpick to pin it back in place.
- Make design holes large enough to provide adequate ventilation for the candle.
- Flatten a spot in the base of the pumpkin for the candle but avoid digging too deep because the pumpkin becomes prone to rot.
- Make sure the flame is not too close to the top of the pumpkin. Use a small tea light candle for safety.
- To prolong the life of the jack-o’-lantern, seal in moisture by coating all cut surfaces with petroleum jelly or vegetable oil, or cover it with a damp towel when not on display.
- Consider giving smaller children stickers, tempera paint, or markers to decorate their own pumpkins.
I hope this post gives you some helpful and useful tips and ideas and also the practical know-how to have a go at carving your own jack o’ lantern this year. Make sure you check out my other Halloween and Autumn time crafts and activities to keep everyone happy and entertained this Autumn season.

I am a preschool and primary school teacher and mum to 3 children. I have been involved in education since 1997 and have trained in a variety of educational specialist areas. It is with this expertise that I write articles to help parents and educators provide quality learning experiences for the children in their care.


