Seaside themed activities

What are your Family Christmas Traditions?

Autumn is a lovely transitional time of year when the fresh colours of summer give way to all things red, orange, golden and brown. I adore how the landscape changes and how the leaves glow in the sunlight. Decorating for autumn (or Fall for those readers in the US) can give your home a warm and cosy feeling just as the nights draw in and the weather chills. It is also the time when we begin to prepare or the cold winter months ahead. Autumn makes me think of Harvest festivals, fluffy blankets, snuggling on the sofa, soups, crackling fires, candlelight and of course Halloween. Many people decorate with pumpkins, leaves and woodland creatures. In this article, we will look at simple decorating ideas you can make with your young children.
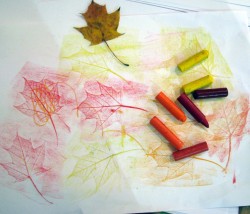
This easy child friendly leaf bunting idea makes a great display for a Harvest Festival, Autumn or Thanksgiving, experience the fun of leaf collecting and rubbing too! This is a very easy way to make a realistic looking leaf, using a real leaf as the template , a piece of paper and a crayon (or crayons). Read on to find out how to make them and check out the ideas for cute Autumn crafts using your rubbings. We’ve included a few other ideas to use Autumn leaves in decorations and crafts in the article too.
Table of Contents
Autumn Leaf Bunting
Age 2+ years
What you need:
- Paper in red, orange and yellow
- Brown or red crayon or chalk
- Cord or string
- Sticky tape
- Autumn leaves
What to do:
- Lay your leaves vein side up on the table.
- Place your paper on top of your leaves.
- Holding your crayon or chalk firmly rub over the leaves using the side of your crayon.
- Cut out the leaves.
- When you have lots of leaves, make a hole in each leaf and thread them onto your cord.
- Secure each in place with a bit of sticky tape so they are spread along the cord.
- Hang as bunting.
For a variation, use the real leaves you’ve collected or cut out leaf shapes and paint them in autumn colours. You could alternate real leaves, leaf rubbings and painted leaves for a wonderful effect.
How to do Leaf rubbings
Age Group: 2 years+
What you need:
- a nice leaf
- paper
- crayons
- masking tape (for younger children)
What to do:
1. Find a nice leaf (get some spare in case it breaks)
2. Put it on any flat surface (desk/table/kitchen counter)
3. Cover it with a piece of paper (and tape it down so it does not move about)
4. Use the flat part of the crayon and colour over the paper
5. The leaf will appear on the page
Okay, so now you have a pile of leaf rubbings…what can you make with them?

Tips and Ideas:
- After each leaf appears, move the paper and use a new colour. Soon you will have a page full of different coloured leaf rubbings.
- Cut out each leaf when it is done and stick it to a ready made tree trunk made of brown paper. You could make the tree as tall as your child and cover it with many coloured leaves. Remember for an Autumn theme to stick to red, brown, yellow and orange.
- Stick them onto a ring shaped piece of card to create a welcoming Autumn wreath. Decorate with conkers, acorns, twigs and other bits found on nature walks. Hang it on your door using a cheerful orange, red or yellow ribbon.
- Make bunting ( as described above)
Make an Autumn leaves placemat
Autumn walks in your warm boots and snuggly jumpers are a highlight of the season. Grab a few carrier bags and see what nature has that you can use to create a wonderful cosy feeling in your home. In the craft, we use real leaves your child has collected collected on one of those nature walks. You’ll need to clean and dry them for a couple of hours so don’t expect to make this autumn leaves placemat on the same day as you go collecting. The leaves you collect will be sandwiched between two pieces of clear contact paper to make this easy personalised placemat.
Age group: 18months+
What you need:
- Clear Contact Paper
- a variety dry leaves
- strips of coloured card/paper (orange/brown/red/gold) to be used to create a frame or border for the placemat -OPTIONAL
- a strip of paper to write child’s name
- coloured pens to write your child’s name
What to do:
- Get out in the cold weather and collect a wide variety of leaves – as many different colors and shapes as you can find. Flatten them under a pile of books overnight.
- Cut 2 pieces of clear contact paper in the size you like your placemat to be. I find A3 size works well.
- Remove the backing from one piece.
- Stick the leaves randomly onto the sticky side of the contact paper. You will have to help younger children to space their leaves appropriately. Don’t overlap the leaves if possible.
- Write your child’s name onto a strip of paper (older children can write their own names) in autumn colour felt tips onto paper which you stick amongst the leaves.
- Once you are satisfied with the design, peel the backing off the second piece of contact paper and cover the leaves with it to seal them in between the contact paper sheets.
- Trim around the edges to neaten them; use pinking shears or other fancy edged scissors if you want!
Autumn crafts can be a lot of fun for you to complete with your child. From going on walks to collect the natural bits you need, to spending a happy crafting session together creating a unique decorative piece for you home it is sure to be something that creates memories you’ll all treasure.

I am a preschool and primary school teacher and mum to 3 children. I have been involved in education since 1997 and have trained in a variety of educational specialist areas. It is with this expertise that I write articles to help parents and educators provide quality learning experiences for the children in their care.


